Monday, February 17, 2014

Hiding Your Clutter In Plain Sight

Clutter:
To litter with things in a disorderly way. 

Dirty:
Soiled or soiling with dirt. Unclean. Foul

Although you can see there is a deference in definitions they are often confused. I can walk into a house that is cluttered, but still see that the house is sanitary and cared for. On the other hand, some peoples idea of cleaning is shoveling all their crap in a draw or closet and not cleaning their truck stop of a toilet. 
Either way, my house always "feels" cleaner when my clutter, not trash that belongs in the dumpster, is stowed away and outta sight! I'd like to share a couple ideas that I use to keep my clutter, but keep it hidden! 

Boxes

Boxes are my absolute favorite way to hide my clutter! Plus, I get to be crafty too! I buy unfinished boxes from the craft store and finish them to match a rooms decor. Fun and practical! I also like to keep an eye out for old cigar boxes. I love the look of them, but you can also revamp these boxes to give them a more modern look. I use these boxes as a catch-all for random items through out the house. Outta sight and clutter up counter space! 
  
 
Storage Ottomans 

 
Storage ottomans are not only a great storage option, they are also functional! You can use these to store electronics and such in the living room, but they can double as footrests and extra seating for company if needed. I also found a great chair that doubles as toy storage for my daughters toys. I LOVE this piece!!!! No stepping on toys in the middle of the night! These storage ottomans are available at any furniture store or home goods store, but there are some great DIY options out there. Thanks Pintrest!


Baskets
 
Baskets are a great organizational tool. I use them in the winter to catch all the gloves, hats, scarfs, ect... Because if there is no basket my daughter will have her wet winter wear all over the floor. This seems to help with prevent the mysterious disappearance of a single glove! Next time you head out, all your winter stuff is in one place. Another trick I use is placing a small basket on the bottom stair case. This way I can toss items that belong upstairs as I walk by. Then you bring everything up at once, saving the number of trips up and down the stairs. This is esspecially helpful and time saving while cleaning up. 

Hooks


Wall hooks make me feel like all my clutter has a home!  There are so many options as far as the type of hooks you can use and just as many ways to use them.  Over the door hooks require no installation and can easily be moved from room to room as your needs change.  I also like the Command Hooks by 3M.  As a renter, the less holes you put in the wall the better!  Plus, they are so strong they hold my daughter backpack (textbooks and all) with no problem.  There are also a number of hook options that screw into the wall.  They can be used for so many purposes and are a great way to get that clutter off the floors.                                                        
                             

These are just some of the ideas I use to keep clutter at bay. How do you tame your clutter? I would love hear your ideas. Got Clutter? I do, but you'd never know! 

Friday, February 14, 2014

The Chores We Hate! UGH!

We all have a household task that we hate to do. The chore that you procrastinate, ignore, or try to push off on another household member. 

What is your least favorite household task? Do you have any tricks to make this chore easier or ways to avoid it? 

I'm very curious! Let me know! Current clients and potential clients looking for help around the house will receive a $discount$ on their next service if you mention or respond to this post before March 1st! 

By the way... My least favorite chore is dishes! Grrrr! 
         

Friday, January 17, 2014

Cleaning Up Christmas

The twinkling light displays, the holiday spirit all around (except at a particular mass retailer that shall remain nameless), the ringing bells and family feasts! Now that the the celebrations have come to an end....It's time to put all those beautiful decorations away until next year.  This is the part I tend to procrastinate. Not this year!  With my small townhome, I started to feel overwhelmed by all the space that my decorations, especially my tree, consume! AHHH!  Plus, I got a little excited this season and had the house decorated two weeks before Thanksgiving. The decorations had to go!
 But.... I've picked up a couple of  tricks this year that make my holiday clean up a snap, plus they will make decorating so much easier next year! If I haven't perked your interest already, the best part is that the supplies are super cheap.  I even got my Christmas cleaned up for FREE!


Christmas décor
 We all know that plastic totes are an organizational God send, but when not used properly, they can become an organizational disaster! When the plastic totes powers not harvested for good, they become an evil hiding spot for unneeded items.  Now that you're beginning to repack those holiday boxes,  it's time to do a quick survey. Are there any items still pack away and went unused this season?  This is a great place to start! If these items didn't make it out this year, and you don't think they will next year, it maybe a good idea to think about getting them out of the house. Many seasonal items have a lot of family sentiment, so I know this can be difficult. Donating unused items to the needy is a great way to unclutter and feel good about getting rid of these unused seasonal items. You may also want to "re-gift" these to family members. This is a great way to clean up but keep these sentiments in the family!   
 
Ornaments  
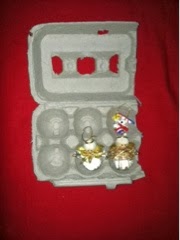
Now that our holiday totes have been cleared out, it's time to repack them! I like to save the most of the packages my ornaments came in. They usually stack easily, and the boxes provide protection from breakage. That being said, some of my ornaments are hand-made, didn't come in a package, or the packages where lost or broken. For these decorations, I use egg cartons. This is an absolutely FREE way to store Christmas ornaments. Empty egg cartons stack up beautifullly in storage totes. They also provided excellent protection for more delicate items. Just place the ornaments in the open slots and, voila! Another added bonus is that the cartons can be trimmed to fit awkwardly shaped ornaments and decorations. 

Lights & Garland 
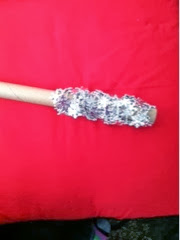
This tip is one of my favorite new tricks! I actually got this idea from one of the clients I have been doing organizational projects for.  All that's needed for tangle-free lights and garland next year is some old magazines and/or empty paper towel or wrapping paper tubes. If you go the magazine route, just roll up the magazine into a tube shape. That's what I did in the picture to the right of this section. I stuck one of the ends of the lights in the tube and just started rolling until I reached the end. Same with the garland. I used the same rolling technique to wrap up my garland. I just threw them into my Christmas tote after I finished rolling them up. Next year, they will just roll off the tube like toilet paper. No fighting involved!!!  I also saw another great Christmas light storage idea on an episode of Racheal Ray. You can probably find this at:
 www.rachealray.com
This organizational expert used one of those contraptions that are used to wrap up an outdoor water hose to wrap a lot of outdoor lights. I don't have that many lights but another excellent, tangle-free way to store all those outdoor Christmas lights! 

The Tree
For those of you out there that purchase real trees, I got nothin'! I enjoy the convenience of an artificial tree.  If I ever crave a piny-fresh scent(that has yet to happen), I can always buy a pine tree car air freshener to hang on my tree! For the last 3 years I have stored my artificial tree in the long, awkward box I purchased it in. This made for difficult organization of my storage closet. It was a game of Tetris everytime I attempted to organize, so eventually I gave up! This year, I decided to purchase one of those special tree storage totes.  When I started looking around I was shocked at the prices!  Perhaps it was the fact that I was looking right after Christmas and they jacked the prices up, but there was no way I was going to spend that much money on plastic.  As I continued to stroll down the storage isles, it dawned on me that I didn't need a special, red and green Christmas Tree storage totes.  All I needed was a larger storage tote!  It worked beautifully, the disassembled tree fit perfectly and the lid snapped shut.  Now I can stack and organized my seasonal decorations without the hassle.  Plus, I saved myself about $20!!! Yay!

Do you have any organizational or storage tips that will make the next holiday season a little more joyous and a little less "ahhh"?  Please share! I love the feedback.


Saturday, January 4, 2014

Stinky House Fixes

With all the hussle and bussle of the holiday season and an amazing Disney vacation, I have neglected my blog. Hopefully you haven't forgotten your friendly neighborhood cleaning lady, 'cause I'm BACK!


I love this time of year! My home is always open for friends and family, and I never know when someone may pop in.  I love to keeping my home inviting, but there is nothing more uninviting than a stinky house!!

An overfilled garbage can, bathroom odors, stinky shoes, or lingering food odors. These smelly smells seems to go hand in hand with entertaining. Fear not, I've got some excellent ideas to treat these everyday odors. 

Microwave Odors
I first learned of this sweet little trick after my daughter and her Ramen Noodles had a disagreement with the microwave. By the way, after the incident, we read the package and Ramen is NOT to be cooked in the microwave! Ramen noodles WILL catch fire in the microwave when water is not added first. I thought my microwave was done for. It was not affected by the flame shooting out of the noodles, but the smell was awful! I actually had a neighbor ask if my house was on fire.  The smell effect the adjoining townhomes!   
My mom suggested I fill a microwave safe bowl with 1/2 water & 1/2 vinegar. Microwave this mixture on high for 2 to 3 minutes. Then allow the bowl to sit inside the microwave for another 15-20 minutes without opening the door. After this time, the steam will have loosened the food residue and you should be able to wipe the microwave clean with a few simple wipes. The vinegar will neutralize the left over odors. My microwave required more than one shot of this routine, but only because of the strong odor left behind from the smoke.

Trash Can Odors
With all the cooking and company this time of year, there is no doubt trash can odors will become an issue.  The first way to handle this type of smell is to remove the offender!  Take that stinky trash out to the dumpster.  If this is not possible or the bag isn't completely full yet, sprinkle a little baking soda over the trash to help absorb some of the odors.  You may also want to clean out the trash can.  The plastic use in trash bins can absorb smells too.  Just use a little soap and water to wipe down the inside and outside of the trash can, then let it dry before adding a bag.


I am ashamed to say this is my trash that has not been taken to the dumpster...
But it's just sooooo COLD! 
I guess I have a hard time "practicing what I preach"!


Bathroom Odors
Giving the bathroom a good cleaning is a great start to distroying bathroom odors. This will take care of the smell of mildew and dampness. While cleaning, keep in mind that plastics absorb odors. Also, don't forget to change out your bath towels, hand towels, decorative towels, and wash rags. You wouldn't believe the smells that get trapped in your towels, besides, it's just good hygiene! 
Another idea for getting rid of bathroom odors is baking soda. I like to add lavender, orange peels, or other aromatics to baking soda. I then display it in a decorative jar in the bathroom. The baking soda absorbs odors, while the aromatics leave a light, refreshing smell. One more thing, lighting a fragrant candle before guests come over is a nice touch! 

General Home Odors
There are a number of different things that cause a stinky home. The first step to taming these smells is identifing the source of and removing any malodorous items.  If you have any family and friends that smoke, set them up with a butt can outside.  This will not only prevent the lingering smoke smell, but it will keep all your loved one more comfortable (and healthy)!  I also keep a shoe basket by the front door for folks to slip their wet shoes in upon entering ( I HATE wet socks)!  I slip a couple of dryer sheets in the basket to mask stinky foot odor.  Not everyone has feet that smell like roses, such as myself! Keeping up with general cleaning is the best way to prevent odors in the first place.  Check out one of my previous to help you stay on top of some of those neglected cleaning tasks!
http://cristencleansomaha.blogspot.com/2013/08/cleaning-check-list.html

In conclusion , a clean house is a fresh house! But even the cleanest of homes develop funky smells.  These tips will help keep your home smelling its very best.  Do you have any tricks or tips for household odors?  I would love to hear some of your feed back!

Tuesday, December 3, 2013

Tip of the Week: Travel Check List

As the holidays approach, so does holiday travel.  Use this check list and you will be ready to go without forgetting a thing!


Organized Travel Check- List


Preparation

·         Hold mail/newspaper

·         Arrange for pet care

Clothing (# of outfits needed :___)

·         Each outfit- top, bottom, & undergarments

·         PJs

·         Shoes (pack sneakers for any trip!)

·         Hats & sunglasses

·         Swimsuits & cover-ups

·         Outerwear according to weather (rain jacket, heavy coat, ect.)

Medicines

·         Prescriptions medications- For each family member

·         Pain reliever- Adults & kids

·         First aid kit (band-aid, Neosporin)

·         Contacts, contact solution

·         Glasses

Toiletries

·         Shampoo, conditioner, body soap

·         Make-up, blow dryer, curling iron, ect.

·         Toothbrush, toothpaste, floss

·         Lotion

·         Sunscreen

·         Nail clippers, nail files

·         Feminine hygiene products

For the Ride

·         Prepackaged snacks

·         Drinks (unless flying)

·         Crossword puzzles, word searches, coloring books

·         Pencils, pens, crayons

·         Books, magazines, other reading material

·         Bags for garbage

Miscellaneous Items

·         Sports gear, soccer ball, baseballs/mitts, beach toys (for camping, beach, & outdoor trips)

·         Laptop, cell phone, iPods, other electronics

·         Power cords, chargers, batteries

·         Camera

·         Pillows, blankets, sleeping bags

·         Passports, IDs (if needed)

Before You Head Out

·         Turn off all lights, electronics

·         Turn up/down thermostat

·         Empty trash

·         Water indoor/outdoor plants

·         Lock all doors, windows


Monday, November 25, 2013

Cleaning With Back Pain

Back pain... OUCH!  Everyone, at one time or another, has or will experience back pain in their life.  regular  back pain usually last for about a week or so.  It is always best to check with your doctor first!!!

 About a year ago, I had severe sciatica.  This caused severe, SEVERE shooting pains that radiated from my lower back down the back of my leg.  This also cause numbness in my lower leg and foot.  I could not move for almost a month!  As my pain started to diminish, I realized my house needed a major cleaning!  I was terrified it do anything because I never wanted to feel pain like that again.  This is when I began asking my doctor and researching at-home ways to prevent the pain from EVER happening again. Although I haven't had another sciatic nerve flare up since, my back hasn't been the same since.  But a girls gotta work!

Here are some of the ways that I prevent future back pain and help relieve some of the regular back pain I sometimes experience.  (always ask your doctor first)

Ergonomics
Everyone has heard the phase "lift with your legs, not your back".  But what does that mean?  Let me break it down for you.  Plus, other ways to move properly while you get those chores done.

-In my opinion, this is the best way to prevent back pain.  I know it sounds cliché, but so true!  This is so simple, but easily forgotten.  Do this every time and it will become habit. Do not bend your back or neck when working in low areas.  Lower your body with the knees, like your squatting. Keeping your back straight and neck high.
 -If the chore your preforming required extend time in a lower area of on the floor, try kneeling. You can use support if needed.  Remember to keep that back tall and straight.
-Do NOT twist from your waist.  If you are reaching for something, move your feet so your whole body turns. 
-Keep frequently used supplies close by.  By eliminating the number of times your reach for an item, you eliminate your chance of a strain.
-Practice good posture everyday.  Sit up, stand tall, and suck it in!

Tools of the Trade
There are a number of items you can use to make chores easier when your back is sore.  These same items may also help prevent further injuries.

-Get a back support belt.  In my experience, these belts do very little once your back is hurting.  But it is a great way to get a little extra support.  My favorite part, back support belts help to prevent  bending at the waist, which will help moving correctly a habit.
-Use the extension hoses on you vacuum.  This will help reduce the amount of bending and reaching preformed during vacuuming.
-Use the end of the broom.  This trick is very versatile.  Simply  wrap a damp rag around the end of your broom stick to wipe up low areas, such as behind the toilet or the floor boards.  No bending over!
 http://www.housekeepingchannel.com/a_576-Housework_and_Back_Pain

Thanks to my super stretcher, super model!
Stretching and Strengthening
-Stretching every day will help prevent future back injury.  There are a number of different stretches that focus on the back.  Every morning before I even step out of bed, I pull each of my legs to my chest, one at a time and hold the stretch for about 15 seconds.(refer to the cute little girl on the right)  It loosens up my tight back every time. Below is a site to help you find more stretching techniques that focus on the back.
http://gentlestretching.com/back_stretches.htm
-Try some yoga.  Yoga has worked miracles for me. Practicing yoga will improve flexibility and strengthen muscles gently. Plus, those yoga  poses are just so darn fun!
http://yogainternational.com/article/view/yoga-for-lower-back-pain/

Just in Case
No matter how careful I am, I still experience lower back pain regularly.  Here are some ideas to ease the pain

-Pre-treat.  Start long days with an anti-inflammatory such Advil. (Check with your doctor first)  Preventing pain from starting is the key to treating back pain.
-Move around a little.  In my experience, when I experience regular back pain it only gets worse when I lay around not doing anything.  Move around a little.  Take a short walk or do a little stretching.  Only do what your body tells you is right because over working will make things worse.
-Heat.  Use a heating pad twice a day for about 15 minutes.  Be sure to place a barrier between the heat and your skin so you don't get burned.
-Always check with your doctor if your back pain does not get better in a few days or your experience any other symptoms along with the back pain.

As I leave you to ponder these wonderful ideas, remember, take your time!  Overdoing it and pushing through the pain will only make a aggravated back even angrier.


Wednesday, November 20, 2013

Tip of the week: 30 Seconds to a Cleaner Home

If your like me, you save all your major household chores for the weekend.  There's so much going on through the week, cleaning MY house is the last priority.  But, I have a few tricks I use that make the major chores just a little easier.  The best part... they only take about 30 seconds!  Now there is no excuse (but I'm sure I can find one) not to do a little clean-up in every room, every day!


Kitchen
Wipe down the appliances
Sprinkle baking soda in the trash can to absorb odors

Living Room
Dust the TV Screen
Empty the vacuum cleaner dirt bin or change the vacuum bag

Bathroom
Empty the bathroom trash can
Clean the mirrors

Bedrooms
Dust the air vents
Wipe down the blinds
Make your bed!!!


Have fun!